

a little place in the world where magic happens
Saturday, January 31, 2015
Keeping It Real Friday

Thursday, January 29, 2015
Thinning out our forest and stripping our Logs to Create something New
 |
| The log before I strip it. |
Off we went into our lower forty to get some trees. I wanted to do some stripping for our pergola on the hill. The logs are alder and about 5-6 inches around. The fatter they are the easier it is. I love the way the logs look when they are stripped and I find it very relaxing to do it. Some times I listen to a podcast or sometimes I just listen to the birds while I am working. There were no birds today, they must know it is not yet time to be out.
 |
| The logs after stripping and the bark on the ground is great mulch. |
Thursday, January 22, 2015
Tiny Fairy Waterfalls of Seashells, Wood and Hot Glue
My mom loves Pinterest. She has some amazing boards and she is constantly adding new things. Well one day last week we were looking for inspiration and we started going through her board of fairy furniture and we came across this really cool tiny fountain. We started to wonder how they did the water and I said
"Do you think its hot glue?"
Mom said "Maybe"
then I said. "Should we go try it?"
And off to the studio we scampered.
Here is the results of our experiment. After many layers of glue and some blue paint we now have some tiny fountains. I love how they turned out.


Keepin It Real... How the Studio Really looks during a Photo Session.
I love taking pictures. It makes me so happy and this week I got to capture this sweet little girls 1 year old photos on her 1st birthday. Mom and Grandma brought her out to our place with lots of outfits and accessories. We had the studio all cleaned up and set up for her pictures. That lasted about 10 minutes before we had stuff all over. Quick costume changes, diaper changes, mom changes, add in a kitten and a cupcake and you get quite the experience. We looked like a tornado had blasted through spreading pink, yellow and sparkly things everywhere.


I had the corner set up with backdrops and lights and as long as we kept throwing in new things to play with she was happy.
Time for a little break so she makes a run for it.
Being 1 and on the move lets you give the photographer all kinds of new angles.
Thankfully she loved the doll crib we had reinforced last week. She really loved sitting in it with all the balloons and it was way easier to keep her in the same spot.
Kitten and Cupcake are so much more fun when you are out of the spotlight.
This is the other side of the studio and you can see all the clothes, car seat, chairs and stuffed animals spread out.
Lexie was so much fun to have in the studio and we got some amazing photos and she really stayed in a great mood the whole time.
I hope you enjoy the "behind the scenes" look at how it really looks in our studio during a session. Thank you to my Mom for having the second camera and capturing all our fun.
Feel free to like, share and comment.
The Best Apple Pie Ever and the Easiest


I use a ready maid pie crust because it is quicker and I am not very patient with pie crusts but feel free to make your own if you want. I have found the IGA pie crust to be the best but Pillsbury works well also.
7 cups of sliced apple (about 5 medium apples)
2 tablespoons lemon juice, fresh or bottled
1 cup sugar
1/4 cup flour
1 teaspoon cinnamon
1/4 teaspoon nutmeg
2 tablespoons butter
In a bowl toss the apples with the lemon juice and in another bowl add the flour, sugar, cinnamon, and nutmeg. Stir this mixture then add to apples and stir all together.
You should have one pie crust in your pie pan ready to load. You should have taken your pie crust out of the refrigerator and let it sit about 30 minutes before you try and unwrap it. This works better for me. I spray my pie plate with pam before I put the pie crust in and this seems to help take out the slices better. I also use a deep dish pie pan because it always spills out of the short pie pans.
Put your apple mixture into the pie and dot with the butter in little chunks. Then put the other pie crust on and pinch the edges. Slice holes into top and spread 1 egg yolk mixed with 1 tablespoon water over the top with pastry brush. It will look like to much but it really comes out looking great. Put it on a cookie sheet and put it in the oven at 425 degrees for 15 minutes. Then turn the oven down to 350 for another 40 -45 minutes. Let the pie cool before cutting.
Enjoy with whip cream or ice cream.
Friday, January 16, 2015
And Behind Door No.1 is.... Keepin it Real Friday the Paint, Glue, Sparkle and Tie Cupboard
Behind these doors is some more of our organized chaos. I am not sure how all of these items came to be in one cupboard but I know they are there and I know where to look when I need my packaging tape or my spray on glitter. Here is another glimpse into our creative world.
I decided to share a few more pictures so you can really see what is going on.

So when you open these doors you get the combo of glues, stencils, string, paint, more glues, blank pads of paper and the overly stuffed "sticker book"
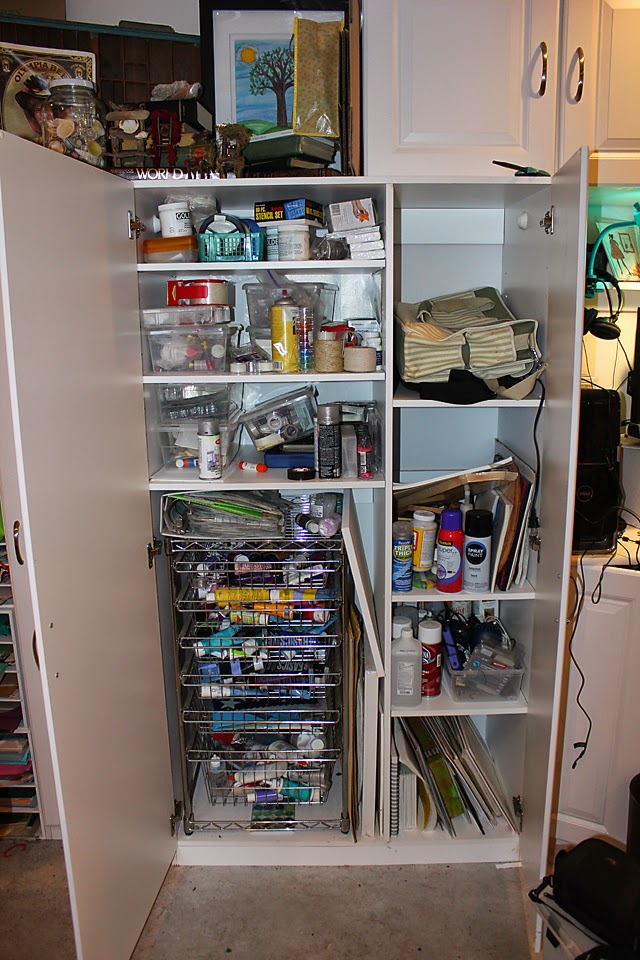

Here is the packaging, sparkle, glue and accessory shelves

This is the glue, more glue stuff, airbrush supplies and exacto knife kit.

This is the giant book of stickers. I took a really wide 3 ring binder and filled it with clear sleeves and then stuffed them with stickers in categories like holiday, flowers and valentines, etc.

This is my rack inside my cupboard. It holds all my acrylic paints, more gluing materials and stencils. After looking at these pictures I realize we have a lot of stuff that makes things stick to other stuff....hmmmm
Thanks for taking a look into my "Keepin It Real Friday" post of our studio.
Happy Crafting and May Everything You Make Turn Out Like the Picture in Your Mind
Tuesday, January 13, 2015
Winter Garden Planning
.JPG)
Last year was the first time my garden really kept us fed. Having it all in boxes and hay spread around really helped with the weeding. Of course my wonderful oldest son also helped a lot. He would come and visit and weed. He didn't want me bending that much. He already has me in a wheelchair and a granny panties. I keep telling him I am not that old but he feels he has to watch out for me.
I love the gardening and the planning and looking at the catalogs. I like to buy heirloom seeds and I should probably save my own. I will get that figured out one day. I get my seeds locally so that I know what grows here. We live in a very different valley with many micro-climates I have to think about. This will be my fourth year here and I have been adding compost and hay and leaves to my garden yearly and the soil is looking really good. I have rabbits just so I can put their poop in the garden. The chicken poop goes into the compost pile.
My only problem with the garden is getting water to it. Last year I set up 4 hoses down to it and a drip system I ran threw most of the boxes and they were on a timer. That seemed to work really well. I just had to remember to go put the water and the timer on. I have three different planting spots outside the garden and I would unhook the main hose and hook it to another one to get each of these. It is a process but it gives me time to enjoy it all and see how the plants are doing. We have a spring feed well and so far water has not been an issue, thank goodness. I hope everyone is planning their garden and enjoying this time of quiet.
Subscribe to:
Posts (Atom)